Saturday, March 29, 2014

DIY Learning Tower WITH MATERIALS LIST!!

Ever seen one of these?

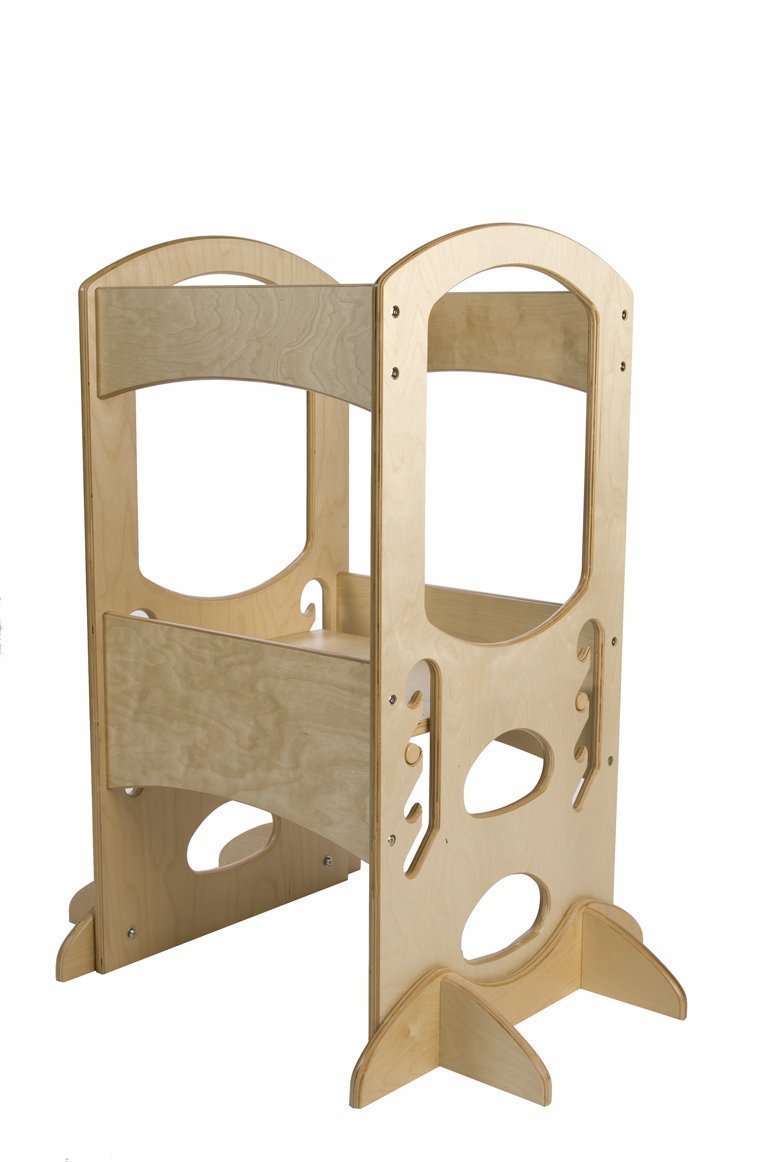
I did...At my favorite children's thrift store, Once Upon A Child.  It was $40 and since there was no adorable little toddler standing on it, I had no clue what the thing was for. Fast forward a few months and I find out it's called The Learning Tower and you can use it to boost your tot up to counter height so they can help with small tasks in the kitchen and explore the world of food. I also learned that it retails for $200. Ouch! Besides wanting to shoot myself for not nabbing it that day, I instantly knew I wanted a fake version. Today we finally got around to building it...


I found a couple tutorials online (here and here) but what frustrated me is that neither had a list of supplies. Nick and I have been in our house only a couple of years, and he's really not the handiest of fellows so we didn't just have scrap wood lying around waiting to build this thing. We also have limited tools.  So what I really needed was a list of all the stuff I'd have to buy in order to add up how much this project was really going to cost before I decided to tackle it. So here it is:

(1) Ikea Bekvam Step Stool ($14.99)
(1) 8 foot long 2x2 ($1.82)
(1) 8 foot long 1x4--you will have a LOT left over ($2.06)
(1) 5/8" Dowel Rod--($2.48) As we were putting this together the thought occurred to me that you could also just use another piece of 2x2 if you don't want to mess with this.  It'd be much easier to attach and you won't need the speedbor. (But you will need another piece of lumber since the leftover of the first 2x2 won't be long enough.) You'll use less than 2 feet of length but it will vary depending on how deep you drill the holes.
(1) Box of 1.5" Wood Screws ($5.58)--we used a #8 size for both types
(1) Box of 2.5" Wood Screws ($5.58)
Total materials cost: $32.51 plus tax & needed tools. I can live with that!

Now for the tools. I'll only include the price of the Speedbor because that's the only tool we purchased. Obviously, you'll have to figure out which tools you personally need to purchase and can figure out your own budget for each. 
  • Tape Measure & Pencil
  • Circular Saw
  • Power Drill
  • A drill bit appropriate for the diameter of your screws (for drilling pilot holes)
  • Wood boring spade drill bit, sometimes labeled as a speedbor--($3.78) This is what it looks like. It's also the one we purchased.You'll use it to make the notches for the dowel rod.
  • Something to set the wood on in order to cut it. We don't have saw horses, so we slid the pieces through the rungs of our ladder.
  • An assistant to cut/hold/screw wood and basically do the manual labor while you pass along the instructions. (For the True DIY'ers that are capable of using power tools unassisted-unlike me-you will still need some help holding boards in place.)
A couple of notes since I don't want to re-write the tutorials (just go check them out, it's easy to understand the instructions)...

Our countertops are 36" high. The vertical 2x2 posts above the stool were cut 16" in length. Measure your counter to determine if you'll need to cut them to a different length, and to see if you'll need additional lumber.

Cut the holes for the dowel using the speedbor before you screw the posts to the top of the stool.  Much easier and much safer. When you're ready to insert the dowel, screw in the first post, set the second post in place and sandwich the dowel in between (in the respective holes) while your lovely assistant screws in the second post.  No wrestling to get the dowel in that way. We did not cut our holes all the way through the 2x2. Instead we made a notch that went about half-way through the post.

We started by measuring and cutting our vertical posts and all other boards were measured and cut as we went along.  Just keep checking the photos and you'll easily see where everything should go. Just make sure that your side rails are the same length (even if when you measure they're not) because it will square up the top once you have everything screwed in place.

Drill the pilot holes.  You can get the screws to go through the wood without them, but hubby did crack it in a couple spots on the 1x4's. Just suck it up and do it...

You'll notice in our photos that we used a piece of 2x2 for the lower rail on the center front. DO NOT DO THIS! As soon as we put Avery in the tower we realized that you need the 1x4 for both front rails so the kid can stand on the tower and not get hit in the knees. This will be remedied on our tower during the next nap-time.

And there you have it!!


Monday, March 10, 2014

DIY Bath Crayons Review


Avery is an active little toddler now so I'm always looking for new ways to entertain her.  She also REALLY enjoys bath time. As in, she starts running to the bathroom the second she hears the water running and tries to climb in while her clothes are still on.  So the other night we tried our hand at some homemade bath crayons. There are tons of "recipes" on the web.  (I found this one and several more through Pinterest.) They all are essentially the same thing...soap mixed with some sort of coloring. Some recipes will tell you to grate a bar of soap, melt the shreds, then mix in your colors and form the crayons freehand.  Not only does that take FOR-EV-ER it's a complete mess and you end up with ugly looking lumps for crayons. I went with the much easier option of using melt-and-pour soap base. I had a few chunks leftover from other projects so I used those. I didn't measure, but it was probably half to one ounce per crayon, but this will also vary depending on which molds you use and how deep you fill them. Almost all the blocks of soap base come with a pre-scored grid on top for easy cutting, just use one of those cubes once they're cut apart on the scoring line. Each one is roughly an ounce.

So I had my base picked out, but the coloring was where things could potentially be tricky.  Some sites suggested soap colorants, others suggested the liquid food coloring straight out of your pantry (the same stuff you use for frosting or dying easter eggs). Others still swore by the gel type of food coloring.  For each of these methods somebody had made a comment along the lines of "Don't use that!  It stained my kid/tub and I still can't get it off!" as well as the opposing "This didn't work at all! The colors never showed up on the wall. Don't waste your time!" posts. So, I'm going to share what I did and the results...

I chose to use liquid soap coloring. Just the basic stuff you can find at craft stores right next to the hunks of soap base. Mostly, because I had it already and I knew I was out of red food coloring. There wouldn't be much point in mixing materials, especially since I didn't even know if this would work, so that's what I went with. I also wanted to load up my soap with the color to make sure it showed up on the tub wall. For each crayon I mixed about one ounce of melted soap base (I used white since I thought the color would show better) with 20 to 30 drops of the liquid soap color. I started with 20 drops, mixed, and if I wanted something brighter or a slightly different shade I added the extra 10 drops. I made red (which was more of a raspberry pink because of the white base), blue, green, yellow, and orange. I used a mold similar to this one so they would be more crayon shaped.


Here's what I found when we used them:

  • The crayons worked better on a dry tub wall, especially when the crayons and the hands holding them were still dry too. They worked when wet, but instead of bright, bold colors, you got pastels.
  • Yellow is completely useless as a tub crayon color.  Wet or dry you can't see it and the crayon itself was so neon yellow it was disturbing, so I know there was enough coloring in the soap.
  • The more obnoxiously bright the crayon is, the better the color on the wall. Don't be shy in adding the soap color for fear of staining. (See below.) Our red crayon which had the most color (I was initially fighting against the pink shade we ended up with) showed up the best. Blue was next since it is a darker color, and then green which I also added extra color to.
  • Those suckers are slippery once you get them wet.  I had a hard time hanging onto them myself and it was significantly more difficult for Avery. She still had fun chasing them around the tub though, so this isn't necessarily a bad thing.
  • They stain...sort of. It will color the water and you'll see the dye wherever your kid directly touches themselves with the crayon (Avery had an awesome set of blue highlights in her hair for a bit) but a quick rinse with water and it comes right off. I will say, we washed our wall before getting out of the tub so I have no idea how this would compare if we'd let it dry completely and tried to wash up later. It is also my belief that it is actually the soap that is dyed and not the object it's applied to, so I'd imagine if you still see color on the wall it's because there's still soap there.  Anything that removes soap scum should also clean up the color. I will also note that we have a traditional fiberglass tub surround and not tile/grout so I have no idea how those would be affected. As a comment stated in one of the various blogs I read before making these crayons, this might be a project that is fun to play with and then you take your bath. Cleanup is easy, but there will be color everywhere. That being said, I don't believe cutting back when coloring the soap will fix the issue. Instead you'll have bath crayons which won't show up on the wall, and that defeats the whole purpose.
  • I suspect this batch of crayons won't last long based on the soap base I used.  It was actually a cheap base leftover from a pre-made kit that I got for free, and not the soap base you'd purchase in a 1 or 5 pound block on it's own.  It was significantly softer than other bases I've used in the past.  Half the crayon had melted into the bath water and the outside of the crayon had a squishy texture by the time we were done. If you want them to last, use a better quality base. I also suspect the mold size/shape helped contribute to our texture issues.  When I make them again I'll use a different mold so they're fun chunky shapes.  Hopefully they'll last longer and will be easier for little hands to hold on to.
  • They are super fun!  Eventually it was time to get out of the tub and go to bed. Avery cried when I took her crayons away because she was having a blast. She has never done this with any other tub toy to date.  We definitely look forward to playing with them again.