

Monday, September 10, 2012
2.5 weeks down...18+ years to go!
It happened. Birth, that is. Our darling Avery is now just over 2 weeks old. She was born August 23rd. 6 pounds, 10 ounces and 20.5 inches long. And that's all the info you get since I'm going to take advantage of her short morning nap time to do fun internet-ey things since I never have the chance any more! I will however leave you with this fabulous photo of our sweetheart...


Monday, July 23, 2012
House Rules for ALL Post-Partum Visitors
We're in the home stretch as far as this pregnancy is concerned, so I wanted to fill everyone in on how Nick and I feel about a few things before the little one arrives. Placing our house rules in a place where all of our loved ones can access it seemed like the simplest way to make our feelings known. It is not our intention to exclude or offend anyone, but this is a very new and challenging time for us. We know everyone is excited to meet our new addition, and we're just trying to be sure that our household will have the opportunity to adjust without its members getting lost in that excitement. Love it or hate it...this is how things will be going down:
·
Unless expressly invited to the
hospital, don't show up there! Mommy doesn't want an
audience during birth and she feels pressure to entertain guests who are in the
waiting room. While still in the hospital after birth, Mommy will be making a
hearty commitment to sleep, recovery, and adjusting to the needs of a newborn. Please do not interfere with this plan! If
you're not immediate family, please plan your visit to take place in our home,
ideally a couple weeks after baby's birth. Additionally, please refrain from using our door bell when you do visit. It drives the dog into a barking frenzy that is not easily calmed. Instead, give Nick or I a quick call to tell us you're outside.
·
If you are ill, have been ill
recently, or even *think* you will be ill- DO NOT COME TO VISIT.
Let me repeat that. DO NOT COME TO VISIT!! Mommy and baby will both be recovering from traumatic physical events to
our bodies. We do not need to deal with
your unwanted germs on top of it. Trust
me, if it exists, we will most likely catch it. (The hospital stay will be bad
enough.) I'd also like to remind you that newborns have not yet developed full immunities to common diseases, which means that your small "cold" is actually endangering my child. Just stay away so I don't have to kick you out.
·
Baby's room is OFF LIMITS when the
door is closed. She is either sleeping, in which case I don't
need you to wake her -or- she is eating, which involves awkwardly learning to
breastfeed. No matter how much I love
you, I guarantee you are not on my
list of approved people to see my boobs, so don't make it more awkward by
trying to be in the room. In addition,
do not be offended if the 2 of us pack up and retreat to this room at a
moment's notice. It means something
needs to be addressed and I wish to take care of it on my own.
·
It's not your place to second-guess
our first parenting decisions. We're breastfeeding, we're cloth diapering, we might be
doing something else you wouldn't do in a million years. If you can't be supportive, keep your 2 cents
to yourself! A tip here and there
may seem welcome to you, but to sleep deprived parents who've spent the past 9
months weighing the pros and cons of these options it may come off as snarky
and judgmental. Some of these decisions might be great for our family, or they
might be great failures. We won't know
until we try, and we shouldn't have to defend ourselves constantly. If you don't like it, pretend it's the
greatest thing in the world until you leave my house.
·
Don't expect to be entertained.
As stated earlier, both Mommy and Baby will be in a state of
recovery. We will be exhausted, sore,
cranky, and generally not in the mood to be perfect hosts to our guests. We will do our best to be polite and exchange
some conversation, but please keep your visits brief so they don't become
overwhelming.
·
If you are willing, feel free to lend
a hand around the house. (And if you aren't willing, don't create more stuff for
Mommy to do!) Some
items we would appreciate help with: Loading/Unloading the dishwasher, Sweeping
the floors, De-cat-hairing the furniture, Cooking us a meal or preparing a
snack, Taking the laundry to the basement so Daddy can wash it, folding laundry
that has already been washed, and taking out the garbage. Furthermore, we want to be especially clear that the first few weeks are an important time of bonding between Mommy, Daddy, and Baby. That means we will be the ones to hold her, while you will be the one doing the housework if you volunteer...not the other way around.
·
Our pets do not enjoy visitors (and
that's putting it mildly). They will also be unsure of the tiny screaming human that
has just become part of our household, who is monopolizing all of mommy's
time. (This will be especially true of
the dog.) Mommy and Daddy also are
unclear about how they will react to baby, as they have never been around small
children before. Please do not
antagonize them. We're learning how to be a new family together and
everybody is stressed out. Unless they
show interest in you (wanting to play, rubbing against your leg, etc.) please
ignore them. Another note about the dog: Even before baby, Moose is extremely protective of Mommy. He has never bitten, but has shown aggression
when he has felt someone is too near to her, so the potential for a bite is
there. DO NOT PRESS HIM as he gives
little to no warning about where his breaking point lies. If he starts to get rowdy, Mommy or Daddy
will remove him to another room. In
general, he is more comfortable with women than men, and he seems to do better
when men are seated in our home rather than standing or walking through
rooms. Please listen if we tell you to
back off. We have enough medical bills
to pay now, we won't be paying yours too.
·
Please keep perfume and cologne to a
minimum. Mommy
and Daddy are both extremely sensitive to strong scents (Baby may be too).
Perfume and cologne often trigger migraines for Mommy and allergy attacks for
Daddy. Not ideal conditions for caring
for a newborn...
Update!
Now that we've had baby #2 I wanted to update this list with one more item (or 2, sorta...) for any future readers.
Please greet my toddler first. She is still too young to communicate when she's feeling left out. When you walk in the door and immediately start fawning over the new addition she doesn't understand why she isn't included in the attention. It's been just her for 17 months and she's never had to share before. On a good day she'll keep playing with her toys and only upon a mother's close inspection could I tell you she is really upset. On a bad day she'll throw a temper tantrum the size of Texas and start chucking those toys at her brother's head the second you sit down on my couch to hold him. (Alternatively she will explore every dangerous option in the room so that constant intervention is required to prevent death or injury, just to get a little attention.) Give her a hug, invite her to sit next to you while you hold the baby, and if someone else is taking a turn with the new guy spend some time playing with her. (P.S. If you get down on the floor with her you'll have a new bestie for life.) Additionally, if you bring gifts for the new baby, try to bring something small for her, even if it's the straw from your soda that you drank on the way over. One of our early visitors brought a bag full of things for Jake. They let Avery open it while Jake and I were nursing in the other room. Then they proceeded to take all the items away and tell her, "That's not for you. It's for your new brother." This action confused her and it made me angry, especially since I wasn't in the position at the time to do anything about it. Giving her something small makes her feel included and it also gives her something new to explore. And for the love of all that's holy, don't pull the stunt that this guest did and take something away seconds after handing to her! "It's for your new brother" implies that she's not important and is being replaced. Nobody wants to feel like that, and those emotions are compounded when you're too little to understand that that isn't the case.
Update!
Now that we've had baby #2 I wanted to update this list with one more item (or 2, sorta...) for any future readers.
Please greet my toddler first. She is still too young to communicate when she's feeling left out. When you walk in the door and immediately start fawning over the new addition she doesn't understand why she isn't included in the attention. It's been just her for 17 months and she's never had to share before. On a good day she'll keep playing with her toys and only upon a mother's close inspection could I tell you she is really upset. On a bad day she'll throw a temper tantrum the size of Texas and start chucking those toys at her brother's head the second you sit down on my couch to hold him. (Alternatively she will explore every dangerous option in the room so that constant intervention is required to prevent death or injury, just to get a little attention.) Give her a hug, invite her to sit next to you while you hold the baby, and if someone else is taking a turn with the new guy spend some time playing with her. (P.S. If you get down on the floor with her you'll have a new bestie for life.) Additionally, if you bring gifts for the new baby, try to bring something small for her, even if it's the straw from your soda that you drank on the way over. One of our early visitors brought a bag full of things for Jake. They let Avery open it while Jake and I were nursing in the other room. Then they proceeded to take all the items away and tell her, "That's not for you. It's for your new brother." This action confused her and it made me angry, especially since I wasn't in the position at the time to do anything about it. Giving her something small makes her feel included and it also gives her something new to explore. And for the love of all that's holy, don't pull the stunt that this guest did and take something away seconds after handing to her! "It's for your new brother" implies that she's not important and is being replaced. Nobody wants to feel like that, and those emotions are compounded when you're too little to understand that that isn't the case.
Friday, June 29, 2012
Moar Behbeh Crafts...
This week I finally got around to sewing up some things for baby. First, I tackled a very easy project using some scraps in the fabric stash. Pacifier clips! (Although I'm sure they'll also be great for toys when she's hanging out in the stroller or playing in the seat of a shopping cart.)
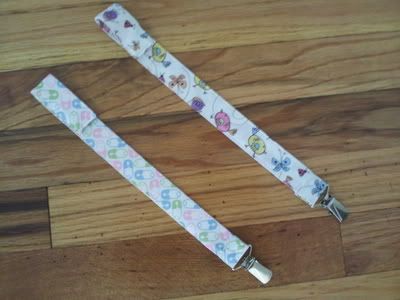
I made the first one (with the baby pins) using the directions from SewMamaSew's website. Super easy, but the interfacing annoyed me because it just seemed too fiddle-ey for such a small project. When I made the 2nd clip I cut my fabric to 4 inches wide. I pressed it in half length-wise and then opened it back up. Then I pressed the edges to the center fold line I created. After that, I refolded the entire piece in half, so that my edges were sandwiched in the middle, and then I topstitched down both sides of the fabric. It was much faster than having to cut a separate strip of interfacing, and with 2 extra layers of fabric sandwiched in the middle it still had that extra bit of support. I finished the clip following the directions from the tutorial just like the first one I made. The whole thing was super easy and I had them both finished in under an hour. Plus, they're cuter than the ones you can buy in the store and they were almost free since the only materials I had to purchase were the mitten clips. (I don't recall how much I paid for the clips, but I want to say around $3?? at JoAnn.)
My next project was a swaddle/sleep sack. Nick and I took a baby care basics course through the hospital a couple of weeks ago and they taught us how to swaddle a baby using a regular recieving blanket. Bless my husband's heart for trying, but he can't swaddle worth beans, so I knew 1 or 2 of these "cheater wraps" would come in handy. He just couldn't remember which side of the blanket to fold up first, and even if he did the baby's face was usually half covered or he still had a foot sticking out some place. He'll get the hang of it eventually, but I thought I'd help him out.
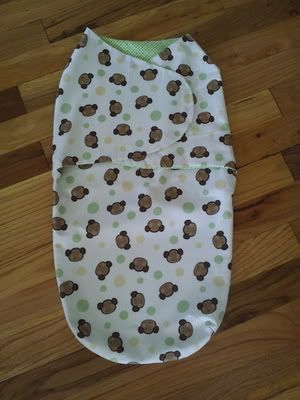 This project was a little more costly than the pacifier clips, because I actually purchased a pattern to make it. The only supplies needed were 1 yard each of 2 fabrics and sew-on velcro, so if you only count that, the project was around $10 or half the price I'd pay for a pre-made swaddler from the store. You could make it for even less if you already had the fabrics. But...the monkeys were too cute to pass up, even at full price so I caved and bought the fabric. I also bought the flannel for the lining to match the green dots on the monkey fabric. If you wanted a warmer swaddler you could also use fleece or maybe some super soft minky. Being that our little girl will be here at the end of August though, I didn't feel the extra warmth was needed quite yet.
The pattern was great and the directions were easy to follow. My only complaint is that the placement for the velcro pieces should have been traced on the right-side of the fabric and not the opposite as instructed. The velcro is sewn on last, through all layers of fabric, so the markings are sandwiched between the outer fabric and the lining (where you have no access to them). This also has the disadvantage that you can see the stitching on the other side of the fabric. For me this was no big deal, but if you were using a thread that didn't match exactly it might look a little wonky on the outside. Thankfully, I made my placement marks with a disappearing ink marker which was visible through the right-side or I would have had a disaster on my hands. So just a heads up for next time...Either: sew your velcro on the exterior fabric before you join it to the lining pieces -or- mark the placement on the right-side of the exterior fabric.
Now all daddy has to do is slip baby's feet into the pocket and cross the arms where the velcro matches!
I made the first one (with the baby pins) using the directions from SewMamaSew's website. Super easy, but the interfacing annoyed me because it just seemed too fiddle-ey for such a small project. When I made the 2nd clip I cut my fabric to 4 inches wide. I pressed it in half length-wise and then opened it back up. Then I pressed the edges to the center fold line I created. After that, I refolded the entire piece in half, so that my edges were sandwiched in the middle, and then I topstitched down both sides of the fabric. It was much faster than having to cut a separate strip of interfacing, and with 2 extra layers of fabric sandwiched in the middle it still had that extra bit of support. I finished the clip following the directions from the tutorial just like the first one I made. The whole thing was super easy and I had them both finished in under an hour. Plus, they're cuter than the ones you can buy in the store and they were almost free since the only materials I had to purchase were the mitten clips. (I don't recall how much I paid for the clips, but I want to say around $3?? at JoAnn.)
My next project was a swaddle/sleep sack. Nick and I took a baby care basics course through the hospital a couple of weeks ago and they taught us how to swaddle a baby using a regular recieving blanket. Bless my husband's heart for trying, but he can't swaddle worth beans, so I knew 1 or 2 of these "cheater wraps" would come in handy. He just couldn't remember which side of the blanket to fold up first, and even if he did the baby's face was usually half covered or he still had a foot sticking out some place. He'll get the hang of it eventually, but I thought I'd help him out.
The pattern was great and the directions were easy to follow. My only complaint is that the placement for the velcro pieces should have been traced on the right-side of the fabric and not the opposite as instructed. The velcro is sewn on last, through all layers of fabric, so the markings are sandwiched between the outer fabric and the lining (where you have no access to them). This also has the disadvantage that you can see the stitching on the other side of the fabric. For me this was no big deal, but if you were using a thread that didn't match exactly it might look a little wonky on the outside. Thankfully, I made my placement marks with a disappearing ink marker which was visible through the right-side or I would have had a disaster on my hands. So just a heads up for next time...Either: sew your velcro on the exterior fabric before you join it to the lining pieces -or- mark the placement on the right-side of the exterior fabric.
Now all daddy has to do is slip baby's feet into the pocket and cross the arms where the velcro matches!
Wednesday, June 27, 2012
Peanut butter Mock-Icecream Sandwiches
Along with the many discomforts of pregnancy during the summer, baby has blessed me with gestational diabetes. That means no fun stuff like lemonade and popsicles because there are too many carbohydrates and sugars that can do wonky things to her growing little body. So...I've had to get creative in how I treat myself on hot sunny days. This recipe is something I came up with based on a peanut butter cookie recipe from Diabetic Living. I tried making the original recipe, which tastes great, but the batter only made 1/2 the amount of cookies that it states. Which of course, means that the carb count for each cookie was twice the stated amount on the site, and therefore out of my range. (Not entirely true...I could have 2 with no problem, but I couldn't have the milk to dunk them in so I decided it wasn't worth it. Hubby got to eat that batch.) So then I tried making the cookies with Splenda. They tasted fine but were very crumbly and fragile. I didn't want to waste them so I combined them with a craving for icecream sandwiches that I'd been having and managed to come up with this frozen treat...
.jpg)
Peanut butter Mock-Icecream Sandwiches-makes 7-9 sandwiches based on how evenly you scoop your cookie dough
1 Cup Peanut butter
1 Cup Granulated Splenda
1 large egg
Approximately 4 oz (half a tub) Lite frozen whipped dessert topping, thawed
(I used the store brand, but it's better known as Cool Whip)
1. Preheat the oven to 375 degrees F. Line a large baking sheet with parchment paper (or grease it generously) and set aside.
2. Combine the peanut butter, splenda, and egg and mix until smooth. Do this by hand or the splenda will fly everywhere.
3. Use a mini icecream scoop (or roll into 1" balls) to dish out the dough. Set the dough mounds 2 inches apart on the prepared pan.
4. Using a small piece of parchment and a flat bottomed drinking glass, smash the dough mounds into flat discs. If you don't have parchment, grease the bottom of the glass to keep it from sticking to the dough.
5. Bake for approximately 9 minutes or until slightly puffed and barely golden around the edges. Remember, splenda won't brown up the same way sugar does, so don't bake them too long. Remove from the oven and allow them to cool completely on a wire rack. They are going to be very crumbly and fragile, so be delicate when removing them from the pan. Set the pan aside so you can re-use it in the next step.
6. Once the cookies are cool, begin assembling the "sandwiches". Flip a cookie so the flat part is facing up. Place a generous dollop of whipped topping on the cookie and set a 2nd cookie on top with the flat side facing the center of the sandwich. Place the assembled cookie on the cooled baking pan while you arrange the rest.
7. After all your cookies have been turned into sandwiches, pop the entire pan into the freezer and leave it there for about an hour. The whipped topping will firm up and have a taste and texture very similar to vanilla icecream. At this point, you can enjoy your treat or individually wrap them in plastic wrap to enjoy later.
If you use the lite version of the whipped topping, an entire sandwich yields roughly 10g of effective carbohydrate, or 1 carb serving. (Which means I could chow 3 if I really wanted to!) The cookies are approximately 4g carbohydrate each and the Whipped topping is 2g. This is based on plugging the ingredient information into the recipe calculator at SparkRecipes.com and the nutrition facts printed on the topping container. They're not the same as a real icecream sandwich and they're still a bit crumbly, but they're a good enough substitute for this chick on a hot summer day. I hope you like them too.
.jpg)
Peanut butter Mock-Icecream Sandwiches-makes 7-9 sandwiches based on how evenly you scoop your cookie dough
1 Cup Peanut butter
1 Cup Granulated Splenda
1 large egg
Approximately 4 oz (half a tub) Lite frozen whipped dessert topping, thawed
(I used the store brand, but it's better known as Cool Whip)
1. Preheat the oven to 375 degrees F. Line a large baking sheet with parchment paper (or grease it generously) and set aside.
2. Combine the peanut butter, splenda, and egg and mix until smooth. Do this by hand or the splenda will fly everywhere.
3. Use a mini icecream scoop (or roll into 1" balls) to dish out the dough. Set the dough mounds 2 inches apart on the prepared pan.
4. Using a small piece of parchment and a flat bottomed drinking glass, smash the dough mounds into flat discs. If you don't have parchment, grease the bottom of the glass to keep it from sticking to the dough.
5. Bake for approximately 9 minutes or until slightly puffed and barely golden around the edges. Remember, splenda won't brown up the same way sugar does, so don't bake them too long. Remove from the oven and allow them to cool completely on a wire rack. They are going to be very crumbly and fragile, so be delicate when removing them from the pan. Set the pan aside so you can re-use it in the next step.
6. Once the cookies are cool, begin assembling the "sandwiches". Flip a cookie so the flat part is facing up. Place a generous dollop of whipped topping on the cookie and set a 2nd cookie on top with the flat side facing the center of the sandwich. Place the assembled cookie on the cooled baking pan while you arrange the rest.
7. After all your cookies have been turned into sandwiches, pop the entire pan into the freezer and leave it there for about an hour. The whipped topping will firm up and have a taste and texture very similar to vanilla icecream. At this point, you can enjoy your treat or individually wrap them in plastic wrap to enjoy later.
If you use the lite version of the whipped topping, an entire sandwich yields roughly 10g of effective carbohydrate, or 1 carb serving. (Which means I could chow 3 if I really wanted to!) The cookies are approximately 4g carbohydrate each and the Whipped topping is 2g. This is based on plugging the ingredient information into the recipe calculator at SparkRecipes.com and the nutrition facts printed on the topping container. They're not the same as a real icecream sandwich and they're still a bit crumbly, but they're a good enough substitute for this chick on a hot summer day. I hope you like them too.
Subscribe to:
Posts (Atom)