Monday, December 20, 2010

Project Eh-Dee-Dee

I didn't finish those paw protectors for Moose.  In fact, I never even looked at them.  I did just about everything else instead. 

  • I made myself a new Christmas Jewelry set.  Here's a photo of the earrings:
The silver pieces are actually mini jingle bells.
  • I baked Christmas cookies
  • I made home-made butter cream and spent 3 hours decorating those Christmas cookies
  • I dug up an old crochet project that has been moving with me over the past 5 years and added a couple more rows to the blanket.
  • I bought lots and lots of yarn for 2011 projects including a pullover sweater pattern.  I even started making the gauge swatches for that sweater.
  • I also tried my hand at making jewelry (shawl pins to be exact) using polymer clay.
  • I finished up 3 different knitting projects that will be Christmas gifts, and even WRAPPED them!
  • I made home-made dog treats, and found a recipe for another variety which Moose and I are going to whip up today.
So I guess it's a good thing it hasn't snowed any more...

Tuesday, December 14, 2010

A work in progress...

It's Michigan winter already!  Snow is blanketing the outdoors in fluffy mounds of beautiful white...and I am carrying my dog. We've been outside a grand total of about 30 seconds and he's staring me down with a sorrowful look as he shuffles from side to side trying to get all 4 paws and his low profile body up out of the snow. Nevermind the fact that we came out here so he could do his morning "business" which has been held for the last 8+ hours while the rest of the household slept.  With a bit of verbal coaxing frome me, one out of 2 actions gets completed.

The stare shifts from, "Please take me inside, pwetty, pwetty, pweeeeease mom!" to a disgruntled, "Okay...here's how it's gonna be.  I hate this stuff, you hate this stuff, lets go inside now.  I'll pee on the floor, you clean it up, and we'll never have to deal with this stuff again.  K? Let's go." And then he runs the length of the leash toward the door, and turns to look at me again. There is more verbal coaxing. There is no action.  There is more staring. The shivering increases, along with a heightened amount of foot shuffling. After a full 5 minutes of standing my ground I can't do it any more.  It's clear he has won this argument, simply for the fact that I don't want him to freeze to death and he's so uncomfortable that he's even taken to flopping on his side in the snow so his paws won't be touching it any more. You wouldn't be able to stand it either...

Kinda like that, only...not happy.

So now we're back indoors, thankfully accident free so far, (Fingers crossed.  He is a dachshund after all...) and I am continuing to tweak his new set of paw protectors.  Moose has never been good in rotten weather, so I knew the above scenario would come along sooner or later.  Last week I stopped by the pet shop to pick him up a pair of pre-made ones.  They wanted $32 for them! My inner black lady surfaced shortly after, screaming "Oh no you di-int!".  Seriously?  32 bucks!  And they weren't garaunteed to even be fully waterproof. Now lets get into why I didn't want to pay that price:

As you know, Moose is a dachshund.  They have odd shaped bodies and his in particular is very small.  99.9% of the time, anything off a clothing rack for dogs will not fit him.  Smalls don't fit him, and he's swimming in a medium. This is still true with this paws, only in the length department with the premade protectors.  They would either be too short and he'd just step out of them, or they'd be too long and would interfere with walking.

Secondly, we know how stubborn Moose can be.  (If you don't, I wish you would refer back to the single instance at the top of this post).  If he doesn't want to do something-in this case WEAR the paw protectors-he will do everything in his power not to.  I was not about to spend that much money for him to chew his way through them trying to get them off.

My solution is to make him some myself.  I headed to the fabric store and bought some polar fleece and some vinyl, along with a small bit of elastic and velcro.  Granted, these are not going to be for long winter walks, but they should keep him comfortable for those few key moments in the morning on days when I can't just bring him inside, since I'll be leaving for work. I spent $10 for all the materials, but I also bought enough fabric to make about 50 of the things.  I wanted LOTS for trial-and-error sizing.  I'm still working out the kinks, but I'll put up a tutorial when I get it figured out.

Wednesday, December 8, 2010

Virtual Crafting

No new major projects this week.  I've been tinkering away with some knitting for Christmas gifts, but that's pretty much it.  Besides...World of Warcraft released their latest expansion yesterday, so of course I've got to dive right in to that!  Behold!  My new little goblin mage!


She may not be as pretty as some of my other characters, but she's still fun to play!

Monday, November 29, 2010

No More Cold Ears!

I finished my very first knitted hat.  I'm so excited!  What's even more exciting is that I wrote the pattern for it.  Aaaaand...As it just so happens, it was my first time trying that too! 


It's so COMFY!
 
 I will admit, I took a lot of help from this excellent 3-part blog post by cosymakes in order to get the measurements correct, but my hat fits perfectly. I couldn't be happier.  Definitely check out the cosymakes' posts if you want to make your own hats, because she does a great job explaining how to break down the measurements, and it is by far the best tutorial I found on how to do so.

Now I just need some gloves to round out my new winter set!


The scarf in matching yarn

Want the pattern?  It's in my Ravelry projects, found here.

Monday, November 22, 2010

My little buttercup

This week I refer you to Made By Rae to make her cute buttercup bag.  Included in her pdf download is the pattern pieces you'll need, and full instructions.  I chose to make the free version, but if you purchase the pattern, it comes in a second size as well.  If you have experience sewing you can probably get away without downloading the diagrams, but they do come in handy if you get stuck.

Here's how mine turned out:


Full materials cost for this project:  A whopping $3.00.  My only complaint is that the free version is a little on the small side. I'm assuming the second pattern included with the purchased version is larger, though I don't know for sure. I can fit my wallet, check book, and cell phone, but that's pretty much it.  It's definitely not the type of purse for ladies that carry their life around.

Also, her instructions for sewing the purse together were very clear, but I was unhappy with how she was attaching the straps.  If you want a more polished way to secure them, before you sew the outer and inner sections together, pin the strap around the exterior of the outer section, leaving about half an inch of fabric sticking up above the top on either side. (See diagram below.) Center the strap right over the side seams to help line it up and pin it in place.  Then put the exterior section (with the strap) inside the liner as instructed and sew around the top edge of the bag. Follow the instructions given for turning and finishing the bag.
Enjoy your cute new purse!

Monday, November 15, 2010

A recipe (sort-of)

It's not really a recipe, but more of a formula.  Remember those candy melts that we used at Easter?  I've got another project for them.  Chocolate Truffles!  Here's what you need:

  • 2 bags of candy melts (I used the light cocoa)
  • Oil based candy flavoring-do not use regular flavored extracts that you'd find in the spice aisle of your grocery store.  These won't blend with the chocolate.  Look for ones that are specifically for making candy. 
  • Heavy Whipping Cream
  • Decorative sprinkles and sugars if desired
First create the filling:
Following the package directions, melt one bag of the candy melts.  Add 1/3 to 1/2 cup of whipping cream to the melted chocolate and stir well.  Now add your flavoring to taste. It will depend on your chosen flavor how much you'll need, so start with a few drops and add your way up until you're happy. I used 1 teaspoon of raspberry flavoring and it came out pretty strong.  Next time I'll probably dial that amount back just a touch.  Place the bowl in the fridge to let the chocolate cool for about an hour.  You want it to be firm, but still pliable.

Once the chocolate is cool, take it out of the fridge and get ready to potentially make a mess. My filling yielded about 60 truffles, so if you've got helpers, this would be the step to start employing them. Line a sheet pan with parchment or wax paper. Using a spoon, scoop up a small amount of the chocolate and roll into half-inch balls using your hands. Set them on the pan as you continue to work, until all of your chocolate is rolled.

Turning them into truffles:
Melt the 2nd bag of candy melts. I used just over 1/2 a bag to coat my truffles, so if you want to save some chocolate for other projects, you can melt a little at a time depending on your need.  Dip the filling balls into the newly melted chocolate until thoroughly coated.  Scoop them out and replace on the pan to harden at room temperature. A fork is really helpful for this, because you can shake off any excess chocolate.  If you want to decorate your truffles, roll them in your sprinkles or sugar after you dip them, or use a different color of candy melts and drizzle it over the top of the finished truffles.  I chose to skip the decoration, but I set the dipped truffles into mini baking cups to harden for individual treats. 

That's it!  Go eat them!

Tuesday, November 9, 2010

It's beginning to look a lot like Christmas!

As I've mentioned before, I work for a craft store.  I really do enjoy it there, but the sickening fact about my store and all the other craft stores in the world is that their holidays are way out of whack.  I've been surrounded by "Christmas" since the end of July, and "Halloween" was already on clearance a week before the day actually arrived.  I however, have managed to resist all temptation to delve into my favorite holiday projects until November.  November to me, is an acceptable month to begin Christmas preparations, and therefore I have done just that.  Behold the wonders I have created with paper and embossing supplies.  If you're lucky, one might arrive in your very own mailbox!

Tuesday, October 26, 2010

Slippers and Scarves and Warm Things! Oh My!


They are done!  I have deemed it so!  They are perfectly fuzzy and fabulous and I love them.  So There!  I'm not going to add on the straps that the pattern calls for, and you can't make me. (Though I still might put on the buttons.)  The originals are supposed to look like this:
The straps I made came out too wide, so when I place them on top of the slippers they cover too much of the toe section.  It just looks strange.

I'm now working on a scarf out of a blended yarn that contains bamboo.  It is SO SOFT.  The knitting is going slowly because I keep stopping to pet the section I already have finished.  : )  I'm also going to attempt to make a hat to go with it.   Because of the softness of the yarn though, I'm not sure how well it will hold a shape.  It's very much a gamble, but if it works it will definitely be worth it.

I'm also still working on the snuggle blankets for the pet shelter.  My cat is "helping" with this by attacking the yarn ball whenever I go to work with it.  I think he might want one for himself too.

Monday, October 11, 2010

The slacker that is me...or not?

I know...I haven't posted in a while, but the slacking in writing has been thoroughly made up for in other crafty endeavors.  Moose's sweater? Done.  (And he looks mighty fabulous if I do say so myself...even without the sweater.)

Snuggle Blankets? 1 finished, a second 25% done.

I've also been baking and canning.  I made a pumpkin pie from a real pumpkin (not from a can), produced 2 and a half pints of apple butter which I had never made before, and with some assistance from my youngest sister, sliced, simmered, and ground enough apples to create 30 quarts of home made applesauce.  Tomorrow will also bring more apple-goodness in the form of tasty pies to share with coworkers and friends.

Also in the works: a new set of slippers which I will be felting (This is my first felting project.) and *finger's crossed* a hooded, long-sleeved tunic.  I have the yarn purchased for the tunic, but nothing is cast on yet.  I'm a little nervous about it, since I'm still not so great with knitting that has to match a gauge, but I know I can do it.


Wednesday, September 22, 2010

Snuggle Up!

It's safe to say that I now spend a majority of my free time scouring Ravelry for new knitting and crochet patterns. Mostly for my dog.  I've pretty much abandoned my September Knit-a-long in favor of making him a new sweater, which will probably be complete in a day or two.  Here's what it looks like so far:


I know it looks wierd, but being a dachshund, Moose has and oddly shaped body.  He's gotta have a turtleneck (this one will fold down some) or he walks right out of the front of his sweater and ends up wearing the thing as a tube top.  Not such a handsome look for a pup.  This pattern was specifically designed for dachshunds.  I've tried it on him a couple of times while knitting it to make sure I had some measurements right and it fits him like a dream! (Here's a tip for trying on pet clothes...wait until the pup is napping before attempting it.  They're a lot less wiggly when they're half asleep, and you can usually get the measurements and have them out of the sweater before they realize what you're doing.  Ask me how I know!)

After I'm done spoiling my pup with his new duds, I plan on spoiling some other fabulous fur-balls from our local animal shelter.  When I was searching for my dachshund-friendly pattern I found a listing from the Snuggles Project. (Click the link to check out the project in more depth.)  Basically, you crochet or knit small blankets for the animals to help them feel more comfortable while they're waiting to find their "forever" home.  It gives them a soft place to snuggle within their shelter cages, which often have metal or concrete flooring. (Hence the name, Snuggles Project.)

I bought 4 skeins of yarn from work this week, which was on sale.  I'll probably be able to make twice as many snuggles from that.  So for about $10, I can help around 8 puppies or kittens, which might even help them get adopted. I get warm fuzzies just thinking about it!  Another great thing about making the snuggles is that they don't have to be perfect, which makes them excellent for someone who is just learning to knit or crochet.  You can get lots of practice with as many types of stitches as you want, and it's going to a good cause when you're finished.  I can't wait to start them.

Monday, September 13, 2010

Ahh Vacation

How are you?  I am fabulous.  Nick and I just returned from our summer vacation, relaxed and ready to head back to work.


During the week I tripled my progress on my new knitting project, which is a wrap I'm making as part of my very first knit-a-long on Ravelry. And tomorrow I'm thinking about checking out a local yarn store that I discovered online.  I'm also stopping by the library to pick up a book on knitting for pets.  If Moose is lucky I might actually purchase some yarn to make him something special.  He deserves it after my abandoning him for vacation this past week.  (Don't worry...we left him at "Grandma's").

What about you?  Any new projects I should know about?

Monday, August 30, 2010

*Shrug*

This weeks project was very much unplanned.  I was shopping my way through JoAnn's and found a set of Speed Stix on clearance for $3.  They usally retail at the same store for $10.99, so at 3 bucks they were begging to be adopted.  If you're not familiar with Speed Stix, they are an insanely large set of knitting needles. (US size 50 to be exact.)  Here's a picture: 


I threw in that bottle of nail polish to help give you a size reference. Suprisingly enough, they're not heavy for their size and are actually quite comfortable to use.  And because they're so big, the knitting goes really fast too.  I used 3 strands of Lionbrand Woolease solids to make this shrug.  It looks terrible on a hanger but is really cute when you have it on.  I'm not agile enough to hold my phone at arm's length and get a decent picture while it's on my body, so this photo will have to suffice. 


I sat down and watched 2 movies and had the last stitch fastened off about 10 minutes after the second flick finished.  The only change I'd make is that I'd cast on a few more stitches so that I'd get longer "sleeves".  These hit just about elbow length, and I'd prefer them a little longer.  If you'd like to try the pattern for yourself click here.  It is from lionbrand's website, so you will need to register in order to view the directions.  The pattern name is Cocoon Shrug.
 

Monday, August 23, 2010

Socktastic!


Well there it is.  Incredibly ill-fitting, with a horrendously ugly pointy toe section, a whole and complete sock made by me.  The very first one.

There will not be a match created for this one, but I now understand the basic construction for the various parts in a sock pattern, so the lonely fella has served his purpose. I can split the stitches for the heel section and I've also figured out that I need to learn kitchener's stitch for a flat toe.  I purposely choose a yarn and needles which were much too big for the pattern, just so I could SEE the stitches in order to learn what I was doing.  I look forward to working with much thinner (and tinier, more frustrating) sock yarn for a pair that will actually fit.

Wednesday, August 18, 2010

Couldn't resist

I saw an article on Yahoo this afternoon about this woman who takes clothes she finds for $1 and re-works them. It was too neat not to share. 

Here's the Yahoo article:
http://green.yahoo.com/blog/guest_bloggers/60/turn-ugly-dresses-into-nice-ones-for-1.html

And here's the blog:
http://newdressaday.wordpress.com/

Monday, August 16, 2010

A craft blog...now with crafts!

Week 2 of crafting a new me went equally as well as the first.  I'm another pound lighter, even having downed several scrumptious Ghiradelli chocolate squares filled with carmel at Nick's company outing this weekend. (Soooo worth breaking the rules....) And this week I even managed to fit in some jewlery making.  I apologize for the photo quality. Black jewelry on a black stand is a little hard to capture. And well...shiny things don't get along well with flash.


Just a simple chain of S-links with black cube beads.  I had made the bracelet earlier, but finally took the time to complete the set with a necklace and earrings.  All the links and findings on all the pieces were formed one at a time by yours truly. In total, it probably took 6-8 hours to finish this set.

I also managed to put together this bracelet and earring combination. The drops were formed using head-pins and Jolee's 6 mm bicone beads.  I used crimp beads to hold the drops in place on memory wire to form the bracelet.

Tuesday, August 10, 2010

Crafting me

Week 1 of my new healthy living program went amazingly well. It's true there were a couple of rough spots, but I stuck with it and I ended up losing 1 pound my first week. (Well, 1 according to the crummy, mostly accurate scale in the bathroom, and 2 according to the wii fit balance board.)

The biggest challenge for me is eating breakfast. I get up very early for work and I'm one of those people who just isn't a morning person.  I sleep until the last possible second, throw some clothes on, take a glance in the mirror to see if I'm somewhat presentable, and then I'm out the door. This whole process usually lasts under 10 minutes, so there's really no option to cook something in that time. I've been rooting around the internet for items to eat that are healthy, quick to grab, and have the ability to be eaten while driving. My best find so far:  Banana Blueberry Muffins

I'm going to continue crafting a new me, so who knows if any of my other projects will get worked on this week, but if anything I'll post a new recipe for you next week. Until then...

Monday, August 2, 2010

Plugging along

The past week has been all about working on projects I've started but have yet to finish.  Still, nothing is finished, but I did make a bunch of progress on numerous items.  I very nearly have one sock finished.  I also worked on the yellow knit throw blanket, a pair of earrings and a matching necklace, a black crocheted jacket that I started a YEAR ago which I found in the craft closet when looking for supplies for the earrings, another batch of lipbalm, and a bunch of game tokens that I'm making out of shrinky-dinks.

This week will probably be more of the same. Nick and I are attempting to start a new healthy-living diet and exercise thing-a-ma-jig this week. So if we don't kill each other from lack of food and general crabbiness about having to work out I won't have the energy to start anything new. I'm being hopeful.

Wednesday, July 28, 2010

...and this little piggy got toasty warm in a new pair of socks

I'm teaching myself to knit socks.  I found this great book at JoAnn's that breaks the process down step by step.

It's fantastic.  Lots of pictures too.  Here's the link for it on Amazon if you want to pick up a copy. Click here
I haven't gotten very far yet because I just haven't spent the time to sit down and knit, but I do have the entire cuff and leg portion finished as well as the beginning of the heel.  I'll let you know when I have one sock finished. What are you crafting this week?

Tuesday, July 20, 2010

Glass Slide Pendants

I've learned a new skill for my crafting arsenal. Soldering.


Side 1

Shopping around on Etsy I had seen some really neat pendants made out of glass slides.  Immediately I wanted to learn how to make them.   Once I looked up the directions I shyed away from the project because I didn't know how to solder.  Still, every few weeks or so I'd see another pendant and the desire to make them returned.  Finally, I caved and decided to teach myself the technique.

I found a question and answer forum on the internet where somebody else had asked about making the pendants. In the responses was a link to Fusion Bead's technique section, which had full directions not only for the pendant project, but for soldering too. These really are the best directions I've found for this project, so if you're interested in trying it, follow the one's they've posted.  I doubt I could improve upon them.  While you're there, check out some of their other jewelry techniques and projects.  Lots of great inspiration and tons on photos to help you out.

For a little less than $20 you can get a complete soldering kit from Michaels or JoAnn's that has the metal tape needed, the soldering tool, and the lead-free solder that doesn't require additional flux.  I also found the glass slides at both stores in the scrapbooking section near the embossing supplies.  There are a couple different sizes of slides, but I chose the 1" square ones for my pendants.  They come in a pack of 24 for around $6.

Side 2

A note about the soldering tool: It looks just like the wood burning kits, but the tips are different.  Make sure you get one that has the tips specifically for soldering. Some of the wood burning kits have them and some do not. I already had a wood burning kit, so I just bought the solder for my first pendant.  By the time I was done, I had melted half of the tip off my tool (It's a wonder I didn't burn the apartment down) because the metal was too soft to use with the solder.

Also, this is a project about patience.  I'm still working to get my soldering even around all my edges.  While I am improving, it took about 2 hours each to finish the pendants above. (Soldering that jump ring on is also not as easy as pictured.)  It's not something that is "hard" to do, but it does take practice. So take your time and don't get frustrated. Besides, the reward is worth it.  Who wouldn't want a beautiful, personalized pendant?

Wednesday, July 14, 2010

Nifty Knitting Roll...and no I don't mean that crazy loom thing

I'm alive.  I swear. And I haven't forgotten you, I was just enjoying a bit of 4th of July vacation time last week, so I never got around to posting. But now I am back with a fun-tabulous craft, which turned out so nicely it almost looks like I knew what I was doing.

I needed a case to keep all my knitting needles in, and not wanting to shell out 25 bucks for some wierd zipper case that was super ugly I went looking for online instructions in how to make one.  I was most inspired by this one from About.com, but I was still unhappy with some of the directions, and I didn't want the pocket dividers visible on the outside of the roll. So I tweaked it as I went, and hopefully I'll be able to convey those changes to you now in a manner that is understandable. I know this is a wall of text, but I assure you this is an easy sewing project, and it'd be a perfect first project for a kid who wants to learn.  Let me know if you need any clarification or if I can explain something better.


So here's what you need:
2 coordinating fabrics*, cut to dimensions specified.  I bought a yard of each which was way more than enough, but if you're budget minded you can purchase less. *You will have 4 cuts of fabric total. If you want to make them all different, be my guest. Also, my cutting mat only accomodates a 23 inch piece of fabric, so I shortened my roll to make the pieces easier for me to cut.  This just means less pockets, but I'll give the dimensions that the About.com instructions reference.
     Fabric A (outer fabric and tall interior pocket):  Cut (1) piece 25 inches x 17 inches. (outer)
                                                                                   Cut (1) piece 25 inches x 11 inches. (tall pocket)
    Fabric B (inner lining and short interior pocket): Cut (1) piece 25 inches x 17 inches. (lining)
                                                                                   Cut (1) piece 25 inches x 8 inches. (short pocket)
1 yard of ribbon in a coordinating color to match your fabric.  This is the closure for the roll, so try to pick something sturdy like a grosgrain ribbon so that it holds up over time.
Thread in a coordinating color
Tools:  Dress maker's chalk, pencil, or tracing paper to mark the pocket divisions. Your preference, you just want it to make clear lines and come off the fabric once you finish sewing.
            Sturdy Ruler
            Scissors or Rotary Cutter and mat
            Pins
            Iron and Ironing Board
            Sewing Machine

The basic construction is this: make the inside section, put with the outside fabric, sandwich in some ribbon and sew. You want the fabric pieces arranged with the longest dimension running horizontally when putting it together. (See the finished picture.) So here we go:


1. Fold down and sew a half inch seam along the top edge of each inner pocket.
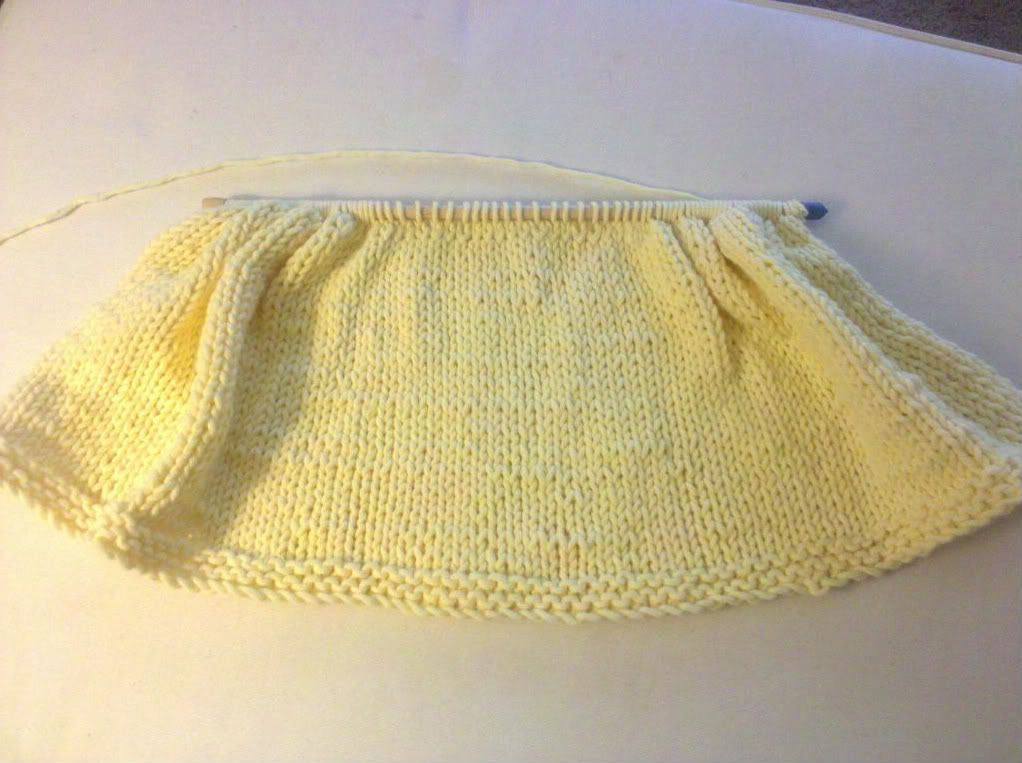
2. Lay the tall pocket on top of the lining fabric (both pieces right side up), aligning the bottom and side edges.
3. Lay the short pocket on top of the tall pocket (right side up), aligning the bottom and side edges. Your fabric pieces should all be laid out like the photo above, in their finished positions (excluding the outer fabric for now).
4. Pin all 3 pieces of fabric together along the side and bottom edges so that they don't slide.
5. Use your ruler to find the center line of your fabric across the 25" length. Mark this measurement with your removable pencil. Draw a line from the bottom of the short pocket to the top of the tall pocket.  This is how you'll keep your sewing lines straight when you actually run it through the machine, so be diligent in lining it up straight and correctly.
6. Starting from your center line, mark the divisions for your pockets moving out toward the edges of the fabric. Again, draw the lines all the way from the bottom edge to the top of the tall pocket. I made my divisions every 2 inches, but you can adjust this as you like to get the pocket size you want. Also, because I shortened my overall width, the pockets on the very end of my roll ended up a little wider since I didn't have enough space to make the next division.
7. Once you have all the divisions marked, sew along the lines, again beginning with the center mark and working your way out to the edges of the fabric. Feed the fabric through the sewing machine starting at the bottom edge and stop sewing just past the top edge of the tall pocket. Once you've sewn the pocket divisions you can remove all the pins.
8. This next step is a little tricky to explain because it seems backwards.  I made a little diagram to help show you what I mean, so hopefully that will help.  Cut your ribbon into 2 equal lengths.  Align the top edge of your ribbon just below the seam line for the top hem of the tall pocket.  Position it so the majority of the ribbon lies across the tall pocket, leaving about an inch hanging over the side edge. You want both pieces of ribbon on the same end of the roll, but it doesn't matter which one you choose.

You want the ribbon laid out this way so that it will be on the correct side once you sew the exterior and interior piece together. Which just happens to be the next step!
9. With your pockets facing up, lay the outer fabric (right side down) on top of the inner section. Pin all the layers together.  You'll have a little inside-out sandwich of your knitting roll.

10. Sew around the outside edge starting with the bottom seam, leaving an opening about 6 inches wide. I used a 3/8" seam allowance around my edge.
11. Clip the corners to your seam line and press your seams open as best you can.
12. Reach inside the "sandwich"  and turn the entire thing right-side out. If you need to, use the end of something pointy to get crisp corners.
13. Pin the opening shut, folding the edges in to match the seam line as best you can.
14. Sew an 1/8 inch seam across the entire bottom edge to close the opening and give a clean looking finish.
15. Load with knitting needles, roll up, tie shut, and go!  You're done! (See, I told you it was easy.)


Monday, June 28, 2010

Derailed by disasters

Alas, I am failing at keeping my crafty commitments. Life has just gotten in the way.  Not quite 2 weeks ago we had a major plumbing break in our apartment building, which led to a giant flood of sewage coating our bathroom for about 3 whole days before it was fully fixed. (Yuck does not begin to cover it.) No sooner did we get that cleaned up and Moose became ill.  The vet has diagnosed him with a bacterial infection (hmm...wonder where he could have picked that up from??) He is going to make a full recovery after a course of antibiotics, but the accompanying vomit and diahrrea with a semi-house trained dog has been less than fun. Needless to say, this has literally been a (pardon the french) shitty couple of weeks.  My heart is just not into my projects, and now thanks to the new veterinarian we visited, neither is my pocketbook. But things are looking up because Thursday is pay day and hopefully I'll get back on track for next week. I've got a sewing project I want to show you...it's a nifty little roll up pouch to keep your knitting needles in. Very simple, but very functional. 

Tuesday, June 22, 2010

Crafting the perfect cookie

The perfect cookie is by definition 1.) Chocolate Chip and 2.) Home made. While point 1 may be arguable to some folks (they'll still be wrong despite the arguing) you still can't beat point number 2. I happened to create a batch of lovely chocolate chip goodness yesterday, so I thought I'd share some of my tips for baking success.


Use the right tools. Invest in a good stand mixer. Nick gave me a very nice Kitchenaid stand mixer as a Christmas gift a few years ago. Before that I had always used a hand mixer and never wanted to upgrade-mostly because of the price of stand mixers, but the hand mixer had never let me down, so I just didn't see the point. The first batch of cookies I made after plugging the thing in, and I found out what I was missing. The dough blended much more evenly, which helped the cookies bake more evenly. The stand mixer has also improved the quality of the cakes I bake, as well as pizza dough.

Parchment paper is your friend. Line your baking sheets with it religiously. It keeps the cookies from sticking to the pan, helps prevent burnt bottoms, and makes clean-up a snap. You can also re-use the same sheet for the whole batch.

Make the rounds of dough as uniform in size as possible. Get yourself a mini ice cream scoop and use it. Scoop, run the tool along the inside of the mixing bowl to press the dough in and skim off the excess, drop into perfect rounds on the pan. It's clean and easy and all your cookies come out to be the same size.

Use the 2-1 rule. Have 2 baking pans for the cookies, but only put 1 in the oven at a time. Having only 1 pan in the center of the oven helps the cookies bake more evenly because the air isn't getting blocked by the second pan.  While one pan is in the oven, the second is either being loaded with more cookie dough or is cooling. More on this after the next tip...

Rotate the pan half-way through the baking time. If the recipe calls for the cookies to bake 12 minutes, turn the pan around at 6 minutes and continue baking.  That way, if your oven has any hot spots it has equally affected the entire batch.  Combining this with the 2-1 rule, here is the process I generally use when baking:

  • Set up the first pan with dough. Let it bake for half the alotted time.


  • Rotate the pan in the oven and set up the second pan with dough.


  • When it's time to take the first batch out of the oven, pull that out and reload with the second pan. Immediately remove the cookies to a cooling rack, or onto a section of countertop covered with a paper sack that has had the bottom cut out, so that it lays flat. The paper helps absorb any excess grease from the cookies and also helps pull away some of the heat. (See how I snuck an extra tip in there. Heh. Did ya?)


  • Reset the timer for the half-way mark on the rotation schedule. Let the pan that was just pulled out of the oven cool during this time.


  • When it's time to rotate the second pan, do so and then set up the original pan again for the next round of baking. Rinse and repeat until all the cookie dough has been used.


  • My final tip is this: Don't trust your timer. Use it as a guide, but watch how your cookies are baking.  Some times different types of pans will need different amounts of time in the oven. This is the case with the pans I have.  They're the same brand, but one set will need 10 minutes in the oven and the other goes closer to 14.  You don't want half of your cookies perfect and the other half to get charred. If they're looking a little crispy, or not quite done, adjust the baking time as necessary until you get a perfect golden brown. Also remember that the baking process will continue for another minute or so once they're pulled out of the oven.  It's better to pull them slightly early and you can pop them back in for another round if they need it after a little cooling time.

    Now go forth and bake!


    Monday, June 14, 2010

    Hijacked!

    No crafts this week.  Instead I've decided to use this weeks' post as a shameless plug for pet food.  Why? A.) Because it's my blog and well...I can. And B.) Because I've come to believe that this stuff has really made a difference, so I wanted to share all the goodness with you.

    Of course at this point I'm probably supposed to mention that I am not in any way being sponsored or paid by the makers of the product I'm going to review for you.  Also, I am not a veterinarian.  Please don't go swapping all your pet food just because I said so.  If you want to give it a try, fantastic! But you know your pets better than I do.  Use some good judgement and give them what they need. Now that's that's over with...

    A couple of months ago I stopped at my local Petco store.  They were having an event for natural pet foods where you could get free samples so I picked up a couple for Moose.  They sat in his food bin for probably another month before we even touched them since Nick and I aren't really into the whole organic/natural foods thing.  It's all a little too woo-woo for us, and we've both worked on a farm before where pesticide use was a common thing, so that doesn't bother us. In fact, we still maintain that fruits and vegetables are fruits and vegetables...they're just as nutritious whether they were sprayed or not.  So when we got the samples it was like, yeah. neat. they're organic. big deal. we'll take some since they're free. And so they sat.

    In addition to our dachshund Moose, we have 2 house cats, Whiskey and Ivan.  Whiskey is a large cat to begin with, but he was starting to look a little more portly than usual (and that's putting it nicely.) I was playing around with the new Wii Fit game that has the fun little option where you can weigh your pets.  I grabbed the fat cat and we hopped up on the board together. Wouldn't you know it, but that chubby fur ball weighs just over 17 pounds! I decided right then and there that he needed to go on a diet. Not ever really caring what he ate before, and just buying the cat food that was on sale, putting him on a diet required some research. So I turned to the internet. 

    Unfortunately it's been a while since I looked all of this up so I don't have specific websites to reference, but the gist of my research is as follows. I found an instructional page about reading pet food labels and how to compare them. (Don't worry...I checked more than one to cross reference the validity of the statements made on each page.) And then of course there was a section about the ingredients in pet food. I was appallled by what was allowed to pass for food products in some of those listings. Some weren't even food, but byproducts of manufacturing processes like making tires! Along with the ingredients on one page was a listing of some common pet ailments which can be caused by those ingredients or the preservatives that are added to make them last in dry pet food. Dandruff, itchy coat, upset tummy...hey Moose has some of those. His food is getting swapped too.

    That's when the comparing began.  I looked at the ingredients and nutritional analysis of over 30 different pet foods and finally decided that Wellness was the brand we were going to go with. All of my boys have been eating it for about 2 and a half months now. Moose is eating Wellness Core, which is grain-free and protein focused. The cats are eating Wellness Indoor Health.  I debated about starting them on the healthy weight formula, but Ivan is pretty much the opposite of Whiskey and he could stand to gain a few pounds, so I didn't want to take away ALL the calories.

    This food has made a HUGE difference in all of them. Most noticable is their coats.  All my boys are soft and shiny. When you pet them it feels like they have just been brushed out and Moose doesn't have dandruff or itchy hot spots any more. The second big difference is the lack of (forgive me if this is TMI) vomit on the living room floor.  With the old food, one or both cats would tend to throw up their breakfast at least twice a week.  We had always thought it was just because they ate it too fast, but now we know it was the food itself upsetting their stomach.  Neither of our cats have thrown up their food ONCE since we've started them on Wellness, not even during the trasition phase when we just started to swap them over to it. Also, because it's more nutritionally sound, they are better satisfied with the food. They tend to eat less at a sitting and don't come begging for more right after they've been fed.  Many times they still have food in their dish when I go to give them their evening portion. I haven't weighed Whiskey, but you can tell he's lost weight just by looking at him. That belly pooch beneath him is more loose skin than fatty flab now. Best of all though, our animals are getting along better because they feel better.  There's a lot less "fighting" since nobody is crabby about the food in thier bowl now.

    My only con to this stuff is that it is UNGODLY expensive.  But all of the pet foods with natural ingredients are.  I decided on Wellness because it was the most reasonably priced for the ingredients I wanted my boys to have. If you find coupons...LET ME KNOW! I am one of the biggest skeptics about new and "natural" things, but I can honestly say we are never going back to generic pet food again.  Seeing the changes that have come about in my pets just from swapping their food has convinced me it was the right decision and paying the nosebleed price is worth it for that fact alone. I'm also going to confess that it has made me wonder about those sprayed vegetables, and all the other processed items, that are in my food too.  It's one of those things where you start to think, "Could this allergy be from that ingredient? How much better would I feel if I went organic too?" I don't think Nick and I are ready to take that leap yet, but seeing my little fur babies happy on the new stuff has warmed my heart.

    So now I challenge you.  You don't have to switch to Wellness, or any other pet food for that matter.  But do this: Learn what's in your pet's food.  Where do the ingredients come from and how does it affect your buddie's body? What you find just might suprise you...

    Monday, June 7, 2010

    Victory and an unappreciative model

    Last week (or maybe it was 2 weeks ago...I don't remember) I told you I wanted to make my dog Moose this knitted sweater.


    3 days at the lake and I've finally done it. (Follow this link for the pattern.) I have to apologize in advance that my pictures are horrible.  I made the mistake of using the digital camera instead of the camera on my cell phone, so they turned up really dark. Also, while he is cute, Moose doesn't really understand how to sit still, even for treats.  I'm pretty sure he continues to wiggle even when he's sleeping, so everything looks a little fuzzy from the movement too. Anyway...here's how it turned out.


    I think it turned out great despite a few flaws, and it is still very wearable. It also made for an excellent intermediate project because I learned a lot from it.  I now know how to do an increase, how to work in the round, how to make ribbing, and I've gotten a lot better at being able to read my knitting so I can tell right away when I make a mistake.  I also taught myself a couple of tricks for fixing those mistakes without ripping out rows and rows of stitching (even though I did have to do that once for this project...but there were no tears this time, so HUZZAH!)

    In addition to all the knitting stuff I learned, it also helped me figure out the fit that Moose needs for his sweaters, which is precisely the reason I need to make him one.  Because he's so broad chested and his body is so long, store bought sweaters and dog coats don't fit him properly. They either won't fit around his chest, or there's so much fabric around his front legs (because we had to get the next size up) that he trips over them. Here's an example:


    See the front part of the sweater where his tags are? (And yes, the little brat is sticking his tongue out at me.  He also does a lip curl trick that makes him look like Elvis.) This pattern is leaving about half of his chest exposed which is a bit troublesome in the winter when he's walking through snow deeper than he is. I can fix this if I knit a larger space between the top edge and the leg holes.  The pattern called for 4" of knitting, but I think 6" would be better for Moose.  Also, the length from the leg holes to the base of the sweater is perfect for his under-side but he's still got a good 3" or so along his back that needs to be covered.  If I were to cast off around the under-side of the sweater and continue back and forth along the top it would give him the coverage he needs. 

    I also know that I need to do better at binding off loosely.  The first time I tried there wasn't enough stretch to the bottom edge and it didn't fit around his chest.  Thankfully, I left a long enough tail on the yarn when I cut it that I just untied the knot and stretched it out along the knitting.  Now it fits just right, even if it does look a little funny on the underside.

    Moose is also smaller than what this pattern is designed for, so I made a few adjustments and prayed they'd be some where close.  It came out just how I needed it to, so it was a pretty good guess. Moose weighs about 9 pounds and is 11 and 1/2 inches long from his shoulders to the base of his tail if that helps you gauge the pattern for your dog. I used Lion Brand Cotton Ease yarn in taupe and with my alterations I used roughly half of a skein.  For the hooded section I used US size 9 straight needles, and for the body I used US size 10- 16" circulars. I knitted the hood section for 7", the body section in stockinette for 4" and the ribbing along the bottom for another 3".  Give it a try!  The trickiest part is the leg openings, but if I could manage them, so can you.  Good luck and let me know how it turns out!

    Tuesday, June 1, 2010

    More baking!

    This past weekend my boyfriend celebrated his 27th birthday.  Being the good girlfriend I am, I decided to make him a cake. It was 90 degrees in our apartment before turning the oven on, I was under threat of out-of-state relatives arriving at my door any second (with no prior plans of doing so), and I had never attempted to decorate with fondant, which was the planned design for the cake. Safe to say, things had the potential to go horribly wrong...but THEY DIDN'T! YAY!


    I used the Wilton Ready-to-Use white rolled fondant.  It was "okay" tasting, but you could definitely tell that it came from a box.  Now that I know how it's supposed to behave, I'll try making my own next time. It was super easy to use though.  I think I had a harder time trying to find counter space to roll it out than I did making the shapes I wanted.  As you can see in the photo I also had no problem coloring the fondant either. It works up like really stiff cookie dough.  You just punch out the shapes you need using cookie or fondant cutters and "glue" the pieces together using a little bit of water. It was fun.  You should try it too.

    Monday, May 24, 2010

    It looks right...

    Here's the status of my knitting adventure after 2 weeks working on and off:


    It looks really funny because my needles are too short for the amount of stitches I have cast on, but it's still turning out decently. The edges are horribly uneven and I'm pretty sure the gauge is way off, but I don't really care about that for this project.  I can always crochet an edge around it to make it bigger if need be, or if I royally screw it up it'll make a nice blankie for my pup.

    I've only had one major melt down so far, having to rip out about 4 rows of stitches after noticing 6 individual stitches (right in the middle of the work) were completely backwards.   There were many tears, and even more cursing, but eventually after enough ripping I got lucky and managed to put the stitches back on the needles in the right direction. Really...I had no idea what I was doing.  I just knew I needed 84 stitches on my needle and started slopping them back on.  When I started knitting again to see if I did it correctly, it turned out to be right. So it's safe to say, this project is going better than all past attempts considering I've gotten this far and only cried once.

    Today I've been messing around with some scrap yarn and another set of needles, checking out knitting videos online.  I think I've gotten the hang of doing increases, and I even tried out using some double pointed needles for knitting in the round.  I want to make this sweater for my miniature dachshund eventually, so I'll need to practice those skills.

    Wish me luck!

    Monday, May 17, 2010

    Knitting for a cure

    This past week has been hijacked by a monstrous head cold. The current week is not holding much more promise. Still, I craft on. In an effort to keep myself immobile, while still being entertained (of course this is the week our cable decides to crap out) I have decided once more to try and learn how to knit.

    I can crochet fairly well and all other attempts at knitting have been thwarted due to the fact that it takes me so freakin' long to get to the same point in a project.  What I can knit in 2 hours, I could probably crochet in 30 minutes.  I get frustrated and then switch formats.  But not this time.

    Here is what I am attempting to make (sans chair...although that would be nice):


    If you want to learn more about the project, it's the "Plush Throw" on Lionbrand yarn's website.  It's a free registration, but that's the only way to access the actual pattern.


    Tuesday, May 11, 2010

    So what'dja make your momma?

    Sunday was mother's day.  I hope you remembered. (And don't say I didn't warn you.)  I've been wanting to share this project with you since I found it, but since I made one as a gift for MY mother I couldn't very well post it until I had given it to her.  So here you go...straight from futuregirl.com, the Starling Handbag.


    You can find the pattern on her downloads page (which conveniently is the page I linked for you above.) I made 2, one for myself and one for Mom.  I followed the pattern for the medium sized bags.  For mom's I chose a light green sugar'n'cream crochet cotton and followed the pattern exactly.  I varied mine a little.  I used Cottonease yarn in charcoal, which actually looks Navy Blue. Also, the pattern calls for 30 stitches in the handles.  I made mine with 50, which after a couple of uses has stretched  to make them just long enough that I can carry the purse on my shoulder instead of using it as a hand bag (without feeling like the entire thing is falling apart.) 

    I also followed her tutuorial for sewing a lining for the bag.  HIGHLY RECOMMENDED. It makes the project seem more finished. And if all of this seems intimidating, just relax.  With as many pictures and detailed instructions that she's got on the site...there's practically NO WAY you could screw up.  Really. These are some of the best tutorials I have seen on any craft site. EVER. Many kudos to her, for the amount of time and effort she put in to post these amazing projects.

    So now you know what my Mom got. What did you make for yours?

    Tuesday, May 4, 2010

    The Great Fail, Part II

    I know it's been a week and you've been dying (insert sarcastic snort here) to find out what happened with my soap mold, but I have to stop and remind you that Mother's day is next Sunday.  So remember to take a time out this week to make her something nice. Okay...back to the story.

    So after putting my mold together, I wanted to test and make sure it wouldn't leak.  As a general rule when choosing a soap mold, if it holds water, it will hold soap. Using this way of thinking, I lined my mold with wax paper and filled it with 4 lbs worth of water. It took all of about 10 seconds for that water to soak through the paper and start pouring out the bottom of the mold.  Luckily I had the forethought to set the mold on an oversized cookie sheet, so the water was well contained. Cleanup was easy but I was discouraged.

    Panicked that my project had majorly failed, I ran over to the Teach Soap forums to request help from the scores of other soap makers who use wooden molds. They suggested differently lining materials, so that's what I tried next.  Parchment paper was the next test subject.  It held water for about 15 seconds.  Then came freezer paper. Maybe 20 seconds.  So I took another trip to Lowe's.

    Vinyl gasket material.  That's what came next.  It's the stuff that is used to seal the edges of doors and windows.  I unhinged the sides of my molds, cut the gasket to length and then forced the hinges back on.  It was messy looking and ill fitting, and utterly horrible. But...I was going to give it a water test any way.  As expected, water poured out faster from my mold than ever before. The side boards were just elevated too far to make a tight seal with the bottom.

    Once again, I ran crying to the forums. This time, my peers suggested just going for the soap.  That my problem may simply be that soap is more viscous than water and will do just fine, where the water keeps pouring out.  I haven't taken up that challenge yet.  The first step will be putting my mold back together minus the gasket material.  I'm extremely nervous about pouring hot caustic liquid into the thing and having it run out all over my kitchen. This could turn out to be a complete disaster, but I guess I'll never know until I try it.

    What about you?  Have you ever had a project turn out so horribly wrong that there was no way to salvage it?

    Monday, April 26, 2010

    The Great Fail, Part I

    I've been wanting a larger soap mold for when I make cold process soap. One, because it's so much work to make it, it's not worth making small batches for all the time I have to put in.  Two, and probably more importantly, it's rare to find a recipe that yields less than a 4 pound loaf of soap.  When you own a single 2.5 pound loaf mold, that just ain't gonna cut it. Sure, I can scale down the recipe, but that requires more math than I want to tackle.


    I've had my eye on some wooden molds with the fancy fold down sides.  Most have little wing nuts to hold the mold together, and then you loosen them up and take the side off to get the soap out. Those little babies are great...and then I look at the price tag. Sorry.  NOT shelling out $35+ to get a hunk of wood and a couple of bolts. The one pictured above is from Brambleberry.com and is priced at $35.99. Still too rich for my blood.

    Since I wasn't buying a mold, I needed to build one. So I went ahead and did the math...a lot of math. I figured out the number of cubic inches per ounce of soap and did multiplication and addition and a bunch of other math stuff to figure out the dimensions I'd need for such-and-such type of soap bar. I'm telling you...it was a LOT of math. (Maybe it only seemed that way since I haven't actually had to DO math in like, 8 years or something, when I last had a calculus class in highschool. But anyway...) And after I did the math, I busted out the drafting table and drew a full scale engineering plan, laying out the exact specifications for how the mold would be built. This, I know, was a bit obsessive and overkill, but I hadn't gotten out my architecture tools in quite some time (probably since the year AFTER I stopped doing math on a regular basis) so that was more of a fun little side project.

    With my plan in hand, I took a trip to Lowe's. I selected a birch plywood to make the mold out of, and my other hardware included a package of hinges, and two 3/8" carriage bolts with matching washers and wing nuts.  Total cost, with tax: $11.50. (No kidding...it really did come to that even amount!)

    I don't have a saw, so I took the boards to my step dad and had him cut out the appropriate shapes I needed.  Once that was finished, I put the mold together and was ready to go.  Or so I thought...

    Tune in next week to find out what happened next.

    Thursday, April 22, 2010

    Sunflower Glycerin Soap

    A while back I purchased a silicone baking pan from Wilton that’s shaped like a flower. I used it once and then it was immediately devoured by that dark monster known as the craft closet. Being the internet junkie that I am, I was reading away at Five Full Plates during their spring cleaning challenge. Those lovely, strong women, through their literary eloquence, FORCED me to take part in their goal making and I chose to battle the craft closet head on. I can’t say I got very far in the challenge, because in nudging that monster to regurgitate its fine loot into an organized and useful display of tools, I found the pan and was then distracted by the idea placed in my head for its use.
    So here’s what you need to make my cute sunflower soaps:


    • 16 oz clear glycerin soap base

    • 1 package of Lavender Buds-I used the Life of the Party Brand sold at Michaels

    • Golden Yellow Soap Colorant

    • Fragrance of your choice

    • Rubbing Alcohol in a small spritzer bottle

    • Circle shaped cookie cutter that will fit inside the daisy mold-I used a fondant cutter from Wilton

    • 8x8 silicone baking pan

    • Wilton silicone daisy pan

    • Glass Container that’s microwave safe to melt soap in-I use pyrex measuring cups because they have an easy pour spout. Mine are the 4 cup capacity, but you could get away with a 2 cup measure for this project.

    • Spoons or skewers for mixing

    • Microwave

    If you’ve ever used lavender in a soap making project you know that it turns brown when the soap hardens. We’re going to use this to our advantage, making it the center of our sunflower soap. Each bar is going to consist of 3 parts: The base, the center, and the over-pour. In between each element you’ll want to spritz the soap with rubbing alcohol, as it helps the layers adhere to each other. You should also use the alcohol on the top of each layer as you pour it to help remove bubbles in the soap. Don’t worry though, the heat in the soap will break down the alcohol so it won’t stay in the soap.

    Preparing the centers
    1. Melt 2-4 oz of the soap base in the microwave following the manufacturer’s instructions.

    2. When completely melted, add two generous handfuls of lavender and mix well. You’re trying to get a dense scattering of the buds, so it almost looks like it’s all buds in the mix and very little soap.

    3. Pour the mixture into the 8x8 baking pan and let it harden; about half an hour or so. Don’t worry if it doesn’t completely cover the bottom. You just want a thin layer.

    4. Spritz the top with rubbing alcohol to remove any bubbles.

    5. Once hardened, use your circle cutter to punch out 6 discs from the lavender soap and set aside.


    The base layer
    1. Melt 4 oz of the soap base and divide it amongst the wells in the daisy mold. You want a thin layer in the bottom of each well. If you don’t use it all, that’s fine, just set it aside to use in the over-pour layer.

    2. Spritz the top to remove any bubbles.

    3. Here’s the tricky part: You want the base layer set up enough that the center discs won’t melt from the heat of the soap, but not so much that it’s completely hardened. If the base is still sort of gel-like on the top, but it will hold the weight of the disc, that’s perfect. If you look at my final soap bars you’ll see a cloudy spot over the center of flower. This is because I waited too long to add the center discs. That cloudy spot is actually an air bubble between the 2 layers where they didn’t adhere well.

    4. The timing will depend on the depth of your base layer of soap, but I’d say about 3-5 minutes (maybe even less) after you pour the base, spritz the top of the base with alcohol and center the lavender circles in each of the daisy molds.

    The over-pour
    1. Measure out approximately ¼ oz of your fragrance and set aside. Measure out your colorant if needed. This is the first time I’m trying out an oxide colorant I purchased from Brambleberry.com, but any non-bleeding yellow colorant of your choice will also work.

    2. Melt 6-8 oz of soap base.

    3. Pour in your fragrance and stir thoroughly.

    4. Add colorant until the soap is your desired shade of yellow, and stir well again.

    5. Spritz the soap layers inside the daisy mold and pour the yellow soap over the top. You want enough in each well to cover the top of the center disc, plus a little more if you have the soap for it.

    6. Spritz with alcohol one last time to remove any bubbles on top.

    That’s it!

    Leave your soap alone overnight. Try not to bump or move it, or you risk putting wrinkles in the soap. When it’s fully hardened the next day, remove it from the daisy pan and wrap the bars in plastic wrap to keep them fresh until you want to use them. And because it’s melt-and-pour, there’s no cure time, so you can use them right away. Have fun sudsing up!