|
| Photo courtesy of Penny Davidson |
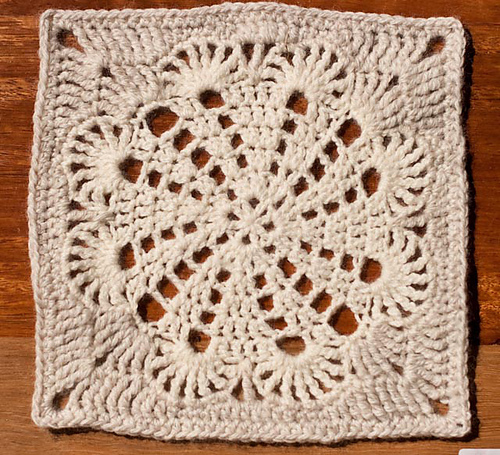
Enough Love to Go Around 2.0
Original Design by Penny Davidson
Rewritten by BlameCrayons
U.S. terminology used. DK weight yarn and size F hook will yield an 8” square. A worsted weight yarn will yield a 12” square. Blocking is required to pull corners into correct shape.
My Ravelry group decided to use Penny’s design as part of our monthly crochet-a-long. It is a very beautiful square, but several of us experienced great difficulty trying to decipher the written directions for it. So much difficulty in fact, that many people chose to move on to another square instead of completing “Enough Love to Go Around”. I decided to try my hand at rewriting the pattern, in the hopes that those who gave up on it, might have the opportunity to include this lovely design in their afghans. ALL the credit for this design should go to Penny Davidson. If you’d like to view the original pattern, please visit her website
here.
I’ve found it easiest to think of each round as being divided into quarters. I’ve named the corners using the children’s song, “I know an old lady who swallowed a fly”, because it made it easier to explain where their location should be. Stop after the first quarter of the round is complete and look at the work. You’ll notice there is a balanced pattern with the “animal” section being the center of the quarter. After you see the pattern, simply repeat it for the remaining 3 quarters of the square and then join to the beginning chain. I hope this will help you visualize what the rounds should look like. If you have any questions, please feel free to ask.
Abbreviations used:
ch=chain, sc=single crochet, dc=double crochet, tr=treble crochet, hdc=half-double crochet, dtr=double treble crochet sts= stitches
Round 1: Ch6. Join with a slst to form a ring. (A magic loop can also be used if preferred.) Ch3 (counts as first DC), ch1. (DC in ring, ch1) 7 more times. Join with a slst to top of ch3. --You will now have 8 DC posts and 8 ch1 spaces.
Round 2: Slst into first ch1 space. Ch3 (counts as first DC). (DC, ch1, 2DC, ch1, 2DC) in the same space. Ch1. *Skip the next ch1 space and the next DC. (2DC, ch1, 2DC, ch1, 2DC) in the next ch1 space. Ch1. Repeat from * 2 more times. Join with slst to top of ch3.—4 clusters made, each having 3 pairs of DC and 2 ch1 spaces.
Round 3: Slst into the space between the first pair of DC on the first cluster from the previous round. Ch3 (counts as DC). DC in the same space. Ch1. 3DC between the 2nd pair of DC on the first cluster of the previous round. Ch1. 2DC between the last pair of DC on the first cluster of the previous round. Ch2. Work your way around the remaining clusters following the same pattern.
2DC between the first pair, ch1
3DC between the 2nd pair (fly made), ch1
2DC between the 3rd pair, ch2
Join with a slst to top of ch3.
Round 4: is worked in a similar fashion to round 3, utilizing the spaces between the DC pairs on the previous clusters. Slst into the space between the first 2 DC. ch3 (counts as DC). Work 2DC in the same space. Ch1. 2DC between the first pair of DC in the fly. 2 DC between the 2nd pair of DC in the fly. Ch1. 3DC between the next pair of DC. Ch2. Work your way around the remaining clusters following the same pattern.
3DC between the first pair, ch1
2DC between the first pair of DC in the fly, 2DC between the 2nd pair of DC in the fly (spider made), ch1
3DC between the final pair, ch2
Join with a slst to top of ch3.
Round 5: is worked similarly to rounds 3 and 4, utilizing the spaces between the DC pairs on the previous segments. Slst into the space between the first 2 DC. Ch3 (counts as DC). DC in same space. DC between the next DC pair. Ch1. In the spaces between the DC pairs of the spider, work 2DC in the first pair, DC in the center space, and 2 DC in the last pair. Ch1. DC between the next DC pair. 2DC between the next DC pair. Ch2. Work your way around the remaining clusters following the same pattern.
2DC between the first pair, DC in the next pair, ch1
2DC in the first pair of DC on the spider, DC in the center pair space of the spider, 2DC in the last pair space of the spider,(bird made) ch1
DC between the next pair of DC, 2DC in the last pair of DC, ch2
Join with a slst to top of ch3.—44 DC posts, 8 ch1 spaces, 4 ch2 spaces.
Round 6: Just like rounds 3-5, use the spaces between the DC pairs. Slst into the space between the first pair. Ch3 (counts as DC) DC in the same space. DC in the next pair, ch1. Working in the bird, 2DC in the first pair, DC in the next 2 pairs, 2DC in the last pair. Ch1. DC in the next pair, 2DC in the next pair, ch3. Follow the pattern around.
2DC in the first pair, DC in the next pair, ch1
Inside the bird, 2DC in the first pair, DC in the next 2 pairs, 2DC in the last pair (cat made). Ch1
DC in the next pair, 2DC in the next pair, ch3.
Join with a slst to top of ch3.—48 DC posts, 8 ch1 spaces, 4 ch3 spaces
Round 7: With only the joining loop on your hook, begin working *in the next ch1 space. (Tr, ch1) 7 times, Tr. Slst between the center pair of DC in the cat. In the next ch1 space, (Tr, ch1) 7 times, Tr. Slst in the first ch of the ch3 space. 2sc in the ch3 space. Slst to the right side of the next DC. Repeat from * around. Join with a slst to the first Tr. Fasten off yarn—you should now have 8 shells around the outside of the square. If you look closely, the entire design resembles 4 hearts, joined together in the center by their lower points.
Round 8: Stop and take a quick look at the heart shapes. You’re going to join the new yarn in the left arch on the top of one of those hearts. (Use a new color if you wish.) **Find the place where you did a slst in the center of the cat from round 7. Found it? From that location, skip 2 Tr and join your yarn in the next ch1 space.
Part A- ch1 (counts as the first sc) *sc in the next Tr. Sc in the next ch1 space* Repeat between the *’s 3 more times. Sc in the next Tr. –you should have a total of 10sc in the top portion of the arch, the last sc being on the second to last Tr of the shell.
Part B- In the next sc (on the flat portion between 2 of the hearts) work 2 Tr. (Dtr, ch2, Dtr)in the next sc (corner made). 2Tr in the joining slst of the next arch. (You should now be at the right edge of the next heart shape.) Skip the next 2 Tr and slst in the next ch1 space, just like when you joined your yarn at the beginning of the round.
Work Part A in the right arch of the heart. Ch2. Tr in the joining slst between the 2 arches. Ch2. Repeat from ** around. Join with a slst to first sc.
Round 9: ch3 (counts as DC), *complete the following over the next 9 sc: hdc, sc in the next 3 sts, hdc, dc in the next 2 sts, tr in the next 2 sts.
Dtr in the next 3 stitches. (2Dtr, ch3, 2Dtr) in corner ch2 space. Dtr in the next 3 sts.
Tr in the next 2 sts, dc in the next 2 sts, hdc, sc in the next 3 sts, hdc, dc.
2DC in the next ch space. Skip the tr and 2 DC in the next ch sp.** DC in the next sc. Repeat from * around to **. Join with slst to top of beginning ch3.
Round 10: ch2 (counts as first hdc). Hdc in every stitch around. When you reach a corner ch3 space, work (3hdc, ch2, 3hdc). Join with slst to top of ch2. Fasten off. Flatten and block into shape.