Friday, June 29, 2012

Moar Behbeh Crafts...

This week I finally got around to sewing up some things for baby.  First, I tackled a very easy project using some scraps in the fabric stash.  Pacifier clips! (Although I'm sure they'll also be great for toys when she's hanging out in the stroller or playing in the seat of a shopping cart.)


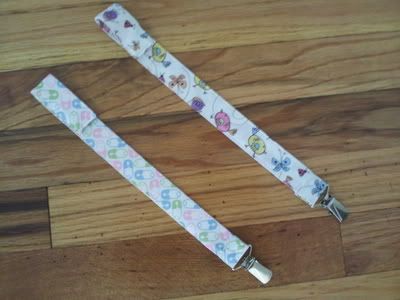
I made the first one (with the baby pins) using the directions from SewMamaSew's website.  Super easy, but the interfacing annoyed me because it just seemed too fiddle-ey for such a small project.  When I made the 2nd clip I cut my fabric to 4 inches wide.  I pressed it in half length-wise and then opened it back up.  Then I pressed the edges to the center fold line I created.  After that, I refolded the entire piece in half, so that my edges were sandwiched in the middle, and then I topstitched down both sides of the fabric.  It was much faster than having to cut a separate strip of interfacing, and with 2 extra layers of fabric sandwiched in the middle it still had that extra bit of support. I finished the clip following the directions from the tutorial just like the first one I made.  The whole thing was super easy and I had them both finished in under an hour.  Plus, they're cuter than the ones you can buy in the store and they were almost free since the only materials I had to purchase were the mitten clips. (I don't recall how much I paid for the clips, but I want to say around $3?? at JoAnn.)


My next project was a swaddle/sleep sack.  Nick and I took a baby care basics course through the hospital a couple of weeks ago and they taught us how to swaddle a baby using a regular recieving blanket.  Bless my husband's heart for trying, but he can't swaddle worth beans, so I knew 1 or 2 of these "cheater wraps" would come in handy.  He just couldn't remember which side of the blanket to fold up first, and even if he did the baby's face was usually half covered or he still had a foot sticking out some place.  He'll get the hang of it eventually, but I thought I'd help him out.

This project was a little more costly than the pacifier clips, because I actually purchased a pattern to make it.  The only supplies needed were 1 yard each of 2 fabrics and sew-on velcro, so if you only count that, the project was around $10 or half the price I'd pay for a pre-made swaddler from the store.  You could make it for even less if you already had the fabrics.  But...the monkeys were too cute to pass up, even at full price so I caved and bought the fabric.  I also bought the flannel for the lining to match the green dots on the monkey fabric.  If you wanted a warmer swaddler you could also use fleece or maybe some super soft minky. Being that our little girl will be here at the end of August though, I didn't feel the extra warmth was needed quite yet.

The pattern was great and the directions were easy to follow.  My only complaint is that the placement for the velcro pieces should have been traced on the right-side of the fabric and not the opposite as instructed.  The velcro is sewn on last, through all layers of fabric, so the markings are sandwiched between the outer fabric and the lining (where you have no access to them). This also has the disadvantage that you can see the stitching on the other side of the fabric.  For me this was no big deal, but if you were using a thread that didn't match exactly it might look a little wonky on the outside. Thankfully, I made my placement marks with a disappearing ink marker which was visible through the right-side or I would have had a disaster on my hands. So just a heads up for next time...Either: sew your velcro on the exterior fabric before you join it to the lining pieces -or- mark the placement on the right-side of the exterior fabric.

Now all daddy has to do is slip baby's feet into the pocket and cross the arms where the velcro matches!


Wednesday, June 27, 2012

Peanut butter Mock-Icecream Sandwiches

Along with the many discomforts of pregnancy during the summer, baby has blessed me with gestational diabetes.  That means no fun stuff like lemonade and popsicles because there are too many carbohydrates and sugars that can do wonky things to her growing little body.  So...I've had to get creative in how I treat myself on hot sunny days.  This recipe is something I came up with based on a peanut butter cookie recipe from Diabetic Living.  I tried making the original recipe, which tastes great, but the batter only made 1/2 the amount of cookies that it states.  Which of course, means that the carb count for each cookie was twice the stated amount on the site, and therefore out of my range.  (Not entirely true...I could have 2 with no problem, but I couldn't have the milk to dunk them in so I decided it wasn't worth it. Hubby got to eat that batch.) So then I tried making the cookies with Splenda.  They tasted fine but were very crumbly and fragile.  I didn't want to waste them so I combined them with a craving for icecream sandwiches that I'd been having and managed to come up with this frozen treat...


Peanut butter Mock-Icecream Sandwiches-makes 7-9 sandwiches based on how evenly you scoop your cookie dough

1 Cup Peanut butter
1 Cup Granulated Splenda
1 large egg
Approximately 4 oz (half a tub) Lite frozen whipped dessert topping, thawed
(I used the store brand, but it's better known as Cool Whip)

1. Preheat the oven to 375 degrees F.  Line a large baking sheet with parchment paper (or grease it generously) and set aside.

2. Combine the peanut butter, splenda, and egg and mix until smooth.  Do this by hand or the splenda will fly everywhere.

3. Use a mini icecream scoop (or roll into 1" balls) to dish out the dough.  Set the dough mounds 2 inches apart on the prepared pan.

4. Using a small piece of parchment and a flat bottomed drinking glass, smash the dough mounds into flat discs.  If you don't have parchment, grease the bottom of the glass to keep it from sticking to the dough.

5. Bake for approximately 9 minutes or until slightly puffed and barely golden around the edges.  Remember, splenda won't brown up the same way sugar does, so don't bake them too long. Remove from the oven and allow them to cool completely on a wire rack. They are going to be very crumbly and fragile, so be delicate when removing them from the pan.  Set the pan aside so you can re-use it in the next step.

6. Once the cookies are cool, begin assembling the "sandwiches".  Flip a cookie so the flat part is facing up.  Place a generous dollop of whipped topping on the cookie and set a 2nd cookie on top with the flat side facing the center of the sandwich.  Place the assembled cookie on the cooled baking pan while you arrange the rest.

7. After all your cookies have been turned into sandwiches, pop the entire pan into the freezer and leave it there for about an hour.  The whipped topping will firm up and have a taste and texture very similar to vanilla icecream.  At this point, you can enjoy your treat or individually wrap them in plastic wrap to enjoy later.


If you use the lite version of the whipped topping, an entire sandwich yields roughly 10g of effective carbohydrate, or 1 carb serving. (Which means I could chow 3 if I really wanted to!)  The cookies are approximately 4g carbohydrate each and the Whipped topping is 2g. This is based on plugging the ingredient information into the recipe calculator at SparkRecipes.com and the nutrition facts printed on the topping container.  They're not the same as a real icecream sandwich and they're still a bit crumbly, but they're a good enough substitute for this chick on a hot summer day.  I hope you like them too.